Showing posts with label vegetarian. Show all posts

Sunday, September 26, 2010

Eggplant parmigiana

I know what you're thinking-- Eggplant, AGAIN?!  This girl has a sick obsession with that stuff!!  Well, I am well aware of this vegetable monopolizing the blogisphere, but a) it IS delicious and b) they were only a buck a piece at the Brookline farmer's market, how could I resist!  
Oh and yes, you read that correctly, I've moved back to the city!! Actually since my last post, I've signed a lease and scored an apartment in Cleveland Circle AND started a new (and AMAZING) job... full-time with benefits baby, wooo!  Why do I digress you may be asking yourself.  Well this move does in fact impact your life directly... living in an apartment with no momma to cook or dad to grill can only mean one thing, MORE blogging, win! 
I think the weather may have officially changed for the season and now it's time to pack away your bathing suits and beach chairs, dust off your oven get your apron on!  Tonight I did just that, with a Sunday sauce and eggplant parmigiana.  I make a good sauce, but I am still tweaking and fine tuning-- once I've got it perfected I'll let you in on the recipe, but for now stick with what you know and use what you're used to whether it be grandma's classic sauce or a jar of ragu! (please don't admit to me you use ragu though.)

Eggplant Parmigiana (serves 6)
Ingredients:
3(ish) cups tomato sauce 
1 eggplant, peeled
1/2 cup Italian bread crumbs
1 egg 
1/2 cup milk
1/3 cup flour
1/4 cup fresh basil, chopped
~1 cup mozzarella cheese 


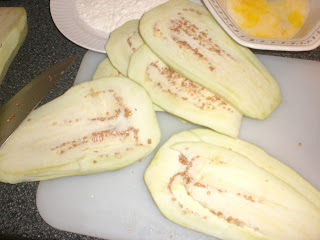
Start by thinly slicing the peeled eggplant in half vertically. Then slice each one in half.
After you've sliced the eggplant, set up a station to bread it.  On one plate, dish out the flour.  In a flat deep dish bowl, add the egg and milk and beat it together.  In the third plate, add the Italian bread crumbs.  Have an extra large plate near by stack all the breaded eggplant.
 Once your all set up, dip each eggplant slice in the flour and shake off the excess.  The flour will help the egg mixture to stick.  Next, dip the floured eggplant into the egg, and lastly hit it with the bread crumbs. 
step 1: flour it

Step 2: dip it in the egg

Step 3: bread crumbs 
Preheat your oven to 350 degrees.  Spray the bottom of an 8x8 inch baking dish with a little non-stick cooking spray, then spoon a little tomato sauce into the dish, you don't need a ton or it'll get too saucy and soggy.  

Then start stacking the eggplant.  Add a little sauce every 2 layers of eggplant, and add a little cheese in the middle.  I didn't measure the sauce or cheese, just look at the pictures and eye ball it.  Just remember, you want to be able to taste the eggplant, not be overwhelmed with cheese and sauce. 
Once the dish is full, spoon a thin layer of sauce onto the top.  Chop the basil and spread it evenly on top, and add more sauce, probably between a half to a full cup.

 
 Bake it in the oven for about 40 minutes, stick a fork through it to see if it's soft.  Remove it from the oven and add the remaining cheese in an even layer.  Bake it in the oven for 5 minutes or until the cheese melts. 
 In lieu of spaghetti, I served the eggplant with roasted Brussels sprouts and a warm baguette. If you like a lot of sauce, add extra once it's plated. 
  I'll blog the roasted Brussels sprouts tomorrow, I never knew I liked them--honestly, I actively avoided them, but then I tried them roasted (in my college dining hall, go figure) and wow, so yummy!  


Tuesday, August 24, 2010

spicy eggplant basil stir-fry

When I hear eggplant and basil, my mind goes straight to the delicious Italian dishes I grew up with but tonight I'm straying from the norm.  Our basil is growing like weeds out back and I just got an eggplant and jalapenos fresh from a family friend's garden (my eggplants aren't quite ready for harvest just yet).  I've had eggplant basil dishes at Thai restaurants before and love the Asian inspired flavors, but could do with out the crazy amounts of extra sauce so I thought I'd give the dish a go.  

Spicy Eggplant Basil Stir-fry (serves 4)
1 medium eggplant
1 tsp crushed garlic
3 green onion stalks
1/2 red bell pepper
 2 jalapeno peppers
1 generous handful fresh basil
1 package firm tofu, drained and pressed 
4 tbsp teriyaki sauce
1 tsp Siracha sauce (optional if you like things HOT)
1 tbsp sesame oil
1/2 cup water

Start by prepping the tofu.  Cut it into smaller chunks, place it on a bunch of paper towels, fold the paper towels to cover the tofu, then place your cutting board on top.  The added weight of you chopping the veggies will help the tofu to drain a little quicker.  Don't let the tofu deter you from this recipe.  If you're not down to give the tofu a try, opt for chicken or lean beef... you need some protein to balance out the meal. 
Next, prep the jalapenos.  It seems like common knowledge but, be careful handling hot peppers!  Don't touch your face, especially your eyes... Slice the peppers in half then take out the seeds and ribs.  If you like things hot leave some of the insides and just give them a good chop. 
 Then cut the green onions (otherwise known as scallions) about an inch long.  Cut the red bell pepper into thin strips.  Next chop the eggplant, I like to leave the skin on, but do whatever floats your boat. 
Heat the oil in a large skillet or wok on medium heat.  Add the eggplant to the pan.  Add the water as needed so the eggplant doesn't stick, you may not need to add the entire 1/2 cup.  Once the eggplant starts to soften, add the peppers, green onion, garlic, and teriyaki sauce. Reduce the heat a little bit. 
Then add the tofu. Be careful when you stir so the tofu pieces don't crumble.  If you like things really spicy, add some Siracha sauce or some other hot sauce of your choice.  Taste it before you add the sauce, the heat from the jalapeno can sneak up on you.  I like it hot, but not inedible.  Lastly, add the basil and cook for another 5 minutes or so, just long enough to wilt the leaves.    
I served the stir fry over brown rice garnished with a sprig of fresh basil. Yum! 


Calorie Count: This recipe contains approximately 195 calories, not including the brown rice. 

Monday, August 9, 2010

cous cous with crunchy roasted chick peas

This recipe is a product of scouring my cabinets and throwing together some hodge-podge ingredients to make a quick and simple meal... I was in a dinner pinch, I was pressed for time and definitely would have settled for a baked sweet potato for a quick dinner but I was ridden with guilt because my last blog post was well over a week ago.   So desperate to create a blog worthy recipe without going to the grocery store, I gathered some classic staple ingredients and got to work.  I just chopped up some veggies in my fridge, including some garden grown zucchini squash from a family friend, whole wheat cous cous, and roasted chick peas.

Cous Cous with Crunchy Roasted Chick Peas (serves 5)
1 cup plus 1/2 cup low sodium chicken broth (use veggie broth to make this vegan)
1 cup dry whole wheat cous cous
1 tbsp olive oil
1/4 large vidalia onion
1/4 red pepper
1/3 cup sliced mushrooms
1/2 cup zucchini
1 can chick peas, drained
2 large garlic cloves
salt, garlic powder, paprika to taste
fresh basil to garnish

First preheat the oven to 375 degrees.   Spray a baking sheet with a little cooking spray and spread out the rinsed and drained chick peas in a single layer.  Sprinkle the peas with the salt, garlic powder, and paprika.  Shake it around a little to coat all the peas.  Place in the oven and bake approx. 30 minutes or until the peas brown up and get crunchy.  
 Meanwhile, start chopping the veggies.  You can really add any veggies you like... I just happened to have the onions, pepper, mushroom and zucchini in my fridge.  Add the olive oil to a large skillet on medium heat.  Smash the garlic cloves with the flat side of a knife and add the smashed garlic to the oil (crushed garlic also works).  Next add the veggies and cook until the veggies soften, then reduce to low heat.  
While the veggies are cooking, add the broth to a small sauce pan, boil on high covered.  When the broth is boiling, remove from heat and add the dry cous cous.  Leave covered for 5 minutes.  Now if you've timed everything just right your chick peas should be just about ready and look like this...
 
 After the five minutes, fluff the cous cous with a fork then add it to the skillet of veggies.  If it looks a little dry, add more broth just a few tablespoons at a time.  
Lastly, add the roasted chick peas to the cous cous.  The chick peas add a nice texture and add enough protein to make a balanced vegetarian meal.  These roasted chick peas make a great substitute for nuts... season with any flavor you like (curry is really good!).   Add a bunch of fresh basil to garnish and even slice up a little more for extra flavor.   
Cooking vegetarian meals every now and again is great for the wallet as well as the environment.  If you can, try to cook at least one meatless meal a week.  If nothing else, it'll force you to think out of the box when planning your meals :)

Sunday, July 25, 2010

tomato and eggplant bruschetta

The basil growing just steps from my kitchen has proven to be a powerful inspiration lately.  Today I made a delicious bruschetta if I do say so myself!  My aunt and owner of Espresso Restaurant in Gloucester has an amazing eggplant bruschetta on her menu and I wanted to try to recreate it myself.  Rather than breading and pan frying the eggplant, I let it marinate in a little olive oil, lots of garlic and crushed red pepper then sauteed it.  It's a really simple and inexpensive recipe and definitely worthy of serving at a party as an appetizer.  With robust flavors of fresh local ingredients, you really can't go wrong! 

 Tomato and Eggplant Bruschetta (serves 4)
Ingredients:
2 ripe tomatoes
approx. 1/3 eggplant
3-4 cloves garlic, divided
crushed red pepper, to taste (~1 tbsp)
1 handful fresh basil (about 1/4 cup chopped)
1/2 tbsp balsamic vinegar
3 tsp olive oil, divided
1/8 c. vegetable broth
2 tsp grated parmesan cheese
salt, to taste
basil leaves to garnish


Start by chopping the eggplant into cubes.  Place in a ziplock bag, add 2 tsp olive oil, 2 large cloves fresh garlic, pressed or finely chopped and the crushed red pepper.  I did this about 2 hours before I started preparing the rest of the bruschetta.  
 When you're ready to start, heat 1 tsp of olive oil in a sauteing pan on low heat and add the eggplant.  Stir constantly so the eggplant doesn't stick.  Add the vegetable broth and cook until the eggplant softens, about 10-15 minutes.  I added a little extra basil in the pan too.  Set aside (cool in the fridge).
Next chop the tomatoes into chunks and place in medium bowl.  Add a light sprinkle of salt.  Then chop the basil and add it to the bowl.  Next add two more cloves of garlic, pressed or finely chopped.  And then add the balsamic vinegar. 
Once the eggplant is no longer hot, add it to the bowl.  Then add the grated cheese.  I used Kraft reduced fat grated cheese (it comes in a green container). 
The longer the bruschetta sits, the more the flavors will marry and the better it gets!  
To serve, I bought a loaf of sliced Tuscan whole wheat bread and I used two slices, cut in half.  I sprayed a piece of tin foil with a little cooking spray, spread 1/4 tsp light Smart Balance "butter" spread on each slice, then sprinkled with garlic powder.   I cooked the bread at 350 degees, flipped the slices after 5 minutes or so, cooked another 5 minutes then put them directly on the rack for another 2-3 minutes.  Just stand close to the oven and watch so they don't burn.  This is one of my favorite recipes on the blog thus far, you definitely have to make this!  


Calorie Count Eggplant bruschetta yields approximately 65 calories per serving.  If served atop two whole slices toasted Tuscan wheat bread calorie count increases to 240 calories. 

Wednesday, July 21, 2010

caprese salad with balsamic reduction

With summer comes heat and humidity, very unfavorable conditions for a kitchen.  When it's hot and sticky, rather than hitting up a restaurant in lieu of turning on your stove, resist the urge and opt for a salad.   The basil in our garden is growing like weeds on steroids so today I made a caprese salad with a balsamic reduction.  This is a 6 ingredient recipe and it is full of flavor.

Caprese Salad with Balsamic Reduction (serves 1)
2 cups spring mix (I like 50/50 blend, half spring mix, half spinach)
3 slices ripe tomatoes
1 oz fresh mozzarella (1/8th of mozzarella ball)
a handful of fresh basil
1 tsp olive oil
2 tbsp balsamic vinegar


Okay, so I don't want to underestimate your culinary abilities but just for good measure, I won't skip any steps...


Slice a tomato cross-wise, cut enough for three thick slices.  Next slice the mozzarella the same way.  If you are following the recipe and the calorie count, just use one slice of mozzarella (1 oz.) and cut it in half into two half circles.   A good rule of thumb when selecting cheese is that the softer the cheese, the fewer calories it has.  Mozzarella is comparatively a lower calorie cheese ounce for ounce. 

Next pluck the leaves off of the stem of the basil and stack them.  Roll it up then slice into strips.
Spread the salad greens on a plate.  Sprinkle the basil strips on top of the greens.  Next layer the tomato and mozzarella.  Put it in the fridge while you reduce the balsamic.


In a small pan heat the balsamic on the stove on low, stirring constantly.  Reducing the vinegar simply means evaporating the water.  The vinegar will thicken and sweeten up.  


Drizzle the salad with a tsp of olive oil and the reduced vinegar.  Garnish with a sprig of basil and season with a little black pepper if you'd like.  Enjoy! 

calorie count: approximately 145 calories per serving.  

Sunday, July 18, 2010

garlicy grilled artichokes

It's easy to get stuck in a rut with the same old veggie routine.  Summer is a great time to mix it up and shop for produce that is a little out of your comfort zone because the grocery stores stalk a greater variety and are usually of better quality.  Enter the artichoke-- admittedly quite intimidating with its sharp, tough leaves and unusual shape.   
I did a little research in preparation to this post and it turns out artichokes are allegedly one of the oldest foods known to man.  They're actually the flower bud of a plant, if allowed to grow they turn into a big violet colored flower.  A lesser known aphrodisiac, this green leafed veg is packed with fiber, vitamin C, and folate.  And side note:  although they may be an aphrodisiac, I would exactly recommend them as a "date food"-- I feel a little koala-esque when I'm scraping at the leaves.  Check out this video if you're unfamiliar with this leafy veg. Seriously, if you have never eaten or seen anybody eat a real artichoke, watch the video!


Garlicy Grilled Artichokes (serves 4)
Ingredients:
2 artichokes
3 tbsp olive oil
3-4 garlic cloves
crushed red pepper, to taste
salt and pepper


Start by trimming the sharp tips of the artichoke leaves, you can do this with either a paring knife or a good set of kitchen scissors.  Peel back some of the leaves by the stem and  cut off the end of the stem.  Don't cut off the whole stem though, that along with the heart is the best part.  Next add the artichokes to a pot with an inch or two of water and cover.   Cook them on high for about 10-15 minutes or until the stem softens. 

While the artichokes are steaming, add the oil to a small dish.  If you don't already have a garlic press, I think they're well worth the investment.  If you are sans garlic press, just chop it finely and add it to the oil, then add the crushed red pepper, I used a generous pinch.  


When the artichokes are ready, take them out of the pan and slice them in half lengthwise. 
That stringy stuff is known as the choke, don't eat it!  Using a paring knife, cut out the choke and the purple leaves like so...
Using a marinating brush, brush the garlicy oil onto the artichokes, making sure you get in between the leaves.
Then cook them on the grill, just a few minutes on each side.  They've already cooked in the steam bath so now you're just adding a nice char and smokey flavor.  
 Season with a little salt and pepper after you take them off the grill.   Just pluck the leaves off one by one and get your koala on :)


This recipe contains approximately 130 calories per serving and is rich in fiber, vitamins and minerals with healthy fats from the olive oil. 

Tuesday, June 29, 2010

tipsy quinoa salad

I had a veggie burger tonight with grilled eggplant and zucchini for dinner and I had some leftover veggies, so I decided to whip up a quick pasta salad to pack for lunch this week.  Drunken noodles are made with alcohol, right?  Well I added just a little bit of white wine to the quinoa...not quite drunken, but tipsy at best.   
I think this recipe makes a great lunch or as a side dish too (paired with grilled shrimp, mmmm).  I think I'll probably cut up some left over fajita chicken from last night for tomorrow's lunch.  This salad has tons of veggies and even some fresh basil--remember my Earth Day herbs?!  They're growing beautifully :)
While we're on that topic, I just acquired some eggplant and pepper plants from a neighbor, I'll be transplanting later this week, watch for a post on vegetable gardens soon!  

Tipsy Quinoa Salad 
Ingredients:
3/4 cup dry red quinoa, rinsed 
1 1/2 cup water or broth
1/4 lg. eggplant, sliced & grilled 
1/3 lg. zucchini, sliced lengthwise & grilled 
1/4 lg. vidalia onion
1/4 red pepper
1/3 cup sliced mushrooms
about 10-15 small, fresh basil leaves
1 tbsp olive oil
1/4 cup white wine 
a shake of paprika
garlic powder, to taste (there is no such thing as too much garlic)
salt & pepper, to taste (but go easy with that salt shaker)


I started by drizzling the eggplant and zucchini a little bit of olive oil, a sprinkle of salt, pepper, and garlic powder and cooking on medium heat on the grill (about 10-15 minutes).  You could skewer the onion, pepper, and mushrooms and grill them too, but I just cooked those in a pan after dinner.   When the veggies are done, chop them into bite size pieces and set them aside.

If you didn't grill the onions, peppers, and mushrooms, chop them and cook them on medium heat in a skillet with another small drizzle of olive oil.   
Once the veggies start cooking, add the grilled eggplant and zucchini to the pan too.  Add the paprika, garlic powder, salt and pepper now. 
While the veggies are cooking, prepare the quinoa.  Just rinse it, put it in a pan with the water/broth on high heat until it boils, cover and reduce it to a simmer until the water/broth is absorbed, it'll take about 10 minutes.  When the Quinoa is done, add it to the big pan of veggies.  Next add the white wine and basil leaves.  Stir for a minute or too and it's ready to go! 
 Like I said before, this makes a great side dish, or a light lunch meal.  Quinoa is rich in protein and the veggies add a ton of vitamins too.  The olive oil has healthy unsaturated fat which is great for skin and hair, and the wine... well that's just for fun ;)    Enjoy!